Take Your NixOS Container Config and Shove It…
9 minutes read
…pretty much anywhere really. Mostly on any of the major cloud providers. All of them have neat templated images that you can use to create a pre-built app environment. Docker, Ghost, a LAMP stack, or even Plesk. The heavy lifting has already been done and all you do is create a VM from one of those images, configure it and you’re good. You spend very little time installing the software and possibly going through the hell of getting everything installed correctly. This is great for commonly used apps and I’m fairly certain that GCP, AWS, and DigitalOcean all have some of the more common setups, like WordPress, as images. But suppose you had a custom app that you wanted to take with you to whichever cloud you went to? The answer lies with NixOS.
Welcome back to our continuing series on NixOS. In a previous article, I showed you how to install NixOS on DigitalOcean. Today I want to go over what more you can do after you get it running on DigitalOcean.
DOING MORE WITH cloud-init USER DATA
If you recall from the previous article, we used cloud-init through DigitalOcean’s User Data to configure our Droplet as soon as it was created. We did the simple task of converting an Ubuntu image to NixOS. Today, we will build on that step to take it further. The premise is you want to deploy an interconnected set of Docker containers that collectively make up your application.
Let’s use the contrived example of WordPress as your application (I could have come up with something more exotic, but then this article would never get written.) Fig 1.1 shows us how the containers are structured to form a complete application. Let’s unpack this further.
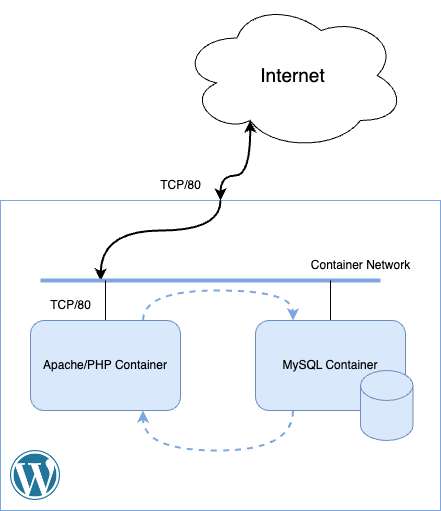
Fig 1.1 – A bare WordPress application as defined in containers
We have two containers that need to talk to each other, so we created a network and put them both on it for easy access. The containers themselves are an Apache server running PHP and a MySQL server as database. Collectively they run the WordPress application. We’ve made TCP port 80 accessible from the Apache/PHP container and also forwarded the same port on the host machine. This configuration enables external access to the Apache container, so if someone from the internet tries to access TCP port 80 on our host machine, it will be directed to the Apache container.
BUILDING THE NIXOS CONFIGURATION FILE
Now that we know what is needed, let’s write a NixOS config file for that:
{ config, pkgs, ... }:
{
  networking.firewall = {
    enable = true;
    allowedTCPPorts = [ 22 80 443 ];
    interfaces.podman1 = {
      allowedUDPPorts = [ 53 ]; # this needs to be there so that containers can look eachother's names up over DNS
    };
  };

  # we enable and use podman - very similar to docker
  virtualisation.podman.enable = true;
  virtualisation.oci-containers.backend = "podman";

  # we create a systemd service so that we can create a single "pod"
  # for our containers to live inside of. This will mimic how docker compose
  # creates one network for the containers to live inside of
  systemd.services.create-wordpress-network = with config.virtualisation.oci-containers; {
    serviceConfig.Type = "oneshot";
    wantedBy = [ "${backend}-wordpress.service" "${backend}-db.service" ];
    script = ''
      ${pkgs.podman}/bin/podman network exists wp-net || \
      ${pkgs.podman}/bin/podman network create wp-net
      '';
  };


  # here we define the containers for setting up wordpress
  # when using oci-containers systemd will start them off at boot time
  virtualisation.oci-containers.containers = {
    wordpress = {
      image = "wordpress";
      volumes = [ "wordpress:/var/www/html" ];
      autoStart = true;
      ports = [ "80:80" ];
      environment = {
        WORDPRESS_DB_HOST = "db";
        WORDPRESS_DB_USER = "exampleuser";
        WORDPRESS_DB_PASSWORD = "examplepass";
        WORDPRESS_DB_NAME = "exampledb";
      };
      extraOptions = [ "--network=wp-net" ];
    };
    db = {
      image = "mysql:latest";
      volumes = ["db:/var/lib/mysql"];
      autoStart = true;
      environment = {
        MYSQL_DATABASE = "exampledb";
        MYSQL_USER = "exampleuser";
        MYSQL_PASSWORD = "examplepass";
        MYSQL_RANDOM_ROOT_PASSWORD = "1";
      };
      extraOptions = [ "--network=wp-net" ];
    };
  };
}
Ok, there’s a lot going on, so let’s dissect it.
Line 1: This is a Nix import statement which allows us to manage the overall configuration and work with Nix packages. In general these two are almost always required.
Lines 3-9: These lines configure the Nix firewall. It is enabled by default, but I explicitly put in the enable option to provide context. On all interfaces, we allow TCP ports 22, 80, and 443. This allows inbound HTTP, HTTPS, and SSH access to the server. Next, we reference the “podman1” interface. This is generally the interface used to handle all things container related. We have to allow UDP port 53 on this interface because it is what all the containers will use to look each other up by name.
Lines 12-13: This will enable Podman. Podman is an alternate way to manage OCI containers including your standard Docker containers. It offers a few benefits over Docker which you can check out at their site. These configuration lines will install and enable Podman on your server.
Lines 18-25: In order for our two containers to talk to each other, we place them on the same network. This allows for isolation and is generally good practice when it comes to grouping containers that need to exchange data among themselves. We have to create this network before we start our containers. To do this, we make use of systemd’s oneshot service type which allows you to run some commands when a server starts up and then goes inactive. The oneshot service is ideal for running one-off commands on server start. These lines check if the network “wp-net” exists, and if not will create it.
Line 30: This will tell NixOS that any containers you define within the block should be treated as systemd services and will be started up on server startup.
Lines 31-43: These lines define our “WordPress” container. Basically it will fetch the wordpress image from dockerhub and start the container with the options I have provided. Let’s look at some of them:
Line 32 is the image name to fetch from dockerhub
Line 33 will create a volume on the host server and map it to /var/www/html. This means you can edit your WordPress source directly from your host if required or you can also copy custom plugins or themes.
Line 35 exposes TCP port 80 of the container to the same port of the host server.
Lines 36-41 set some environment variables during the first start of the container. This will tell WordPress where the database it should use is, what username and password to connect on and to which DB it should connect.
Line 42 is where you can set some additional command line parameters like if you use docker from the command line. Here, we tell the container to join the “wp-net” network that we created earlier.
Lines 44-55: These lines define the database container. An almost identical setup is used to that of the WordPress container, so I won’t go into detail here.
What’s exciting about this configuration file is that you can run it on any NixOS machine and receive exactly the same results. The beauty of NixOS is in its determinism. Whether you run this configuration on DigitalOcean, GCP, or even on your own server, you will always end up with the same end result.
USING THE CONFIGURATION FILE IN USER DATA
Our next step is to use this configuration file in a new VM that we create. We already know how to create a DigitalOcean Droplet and convert the machine into NixOS, now we build on top of that and actually configure our NixOS machine. We will use nixos-infect once again. This time, there’s a slight change. Let’s prepare the User Data for DigitalOcean:
#cloud-config
write_files:
- path: /etc/nixos/host.nix
  permissions: '0644'
  content: |
    { config, pkgs, ... }:
    {
      networking.firewall = {
          enable = true;
          allowedTCPPorts = [ 22 80 443 ];
          interfaces.podman1 = {
            allowedUDPPorts = [ 53 ]; # this needs to be there so that containers can look eachother's names up over DNS
          };
        };

        # we enable and use podman - very similar to docker
        virtualisation.podman.enable = true;
        virtualisation.oci-containers.backend = "podman";

        # we create a systemd service so that we can create a single "pod"
        # for our containers to live inside of. This will mimic how docker compose
        # creates one network for the containers to live inside of
        systemd.services.create-wordpress-network = with config.virtualisation.oci-containers; {
          serviceConfig.Type = "oneshot";
          wantedBy = [ "${backend}-wordpress.service" "${backend}-db.service" ];
          script = ''
            ${pkgs.podman}/bin/podman network exists wp-net || \
            ${pkgs.podman}/bin/podman network create wp-net
            '';
        };


        # here we define the containers for setting up wordpress
        # when using oci-containers systemd will start them off at boot time
        virtualisation.oci-containers.containers = {
          wordpress = {
            image = "wordpress";
            volumes = [ "wordpress:/var/www/html" ];
            autoStart = true;
            ports = [ "80:80" ];
            environment = {
              WORDPRESS_DB_HOST = "db";
              WORDPRESS_DB_USER = "exampleuser";
              WORDPRESS_DB_PASSWORD = "examplepass";
              WORDPRESS_DB_NAME = "exampledb";
            };
            extraOptions = [ "--network=wp-net" ];
          };
          db = {
            image = "mysql:latest";
            volumes = ["db:/var/lib/mysql"];
            autoStart = true;
            environment = {
              MYSQL_DATABASE = "exampledb";
              MYSQL_USER = "exampleuser";
              MYSQL_PASSWORD = "examplepass";
              MYSQL_RANDOM_ROOT_PASSWORD = "1";
            };
            extraOptions = [ "--network=wp-net" ];
          };
        };
    }
runcmd:
- curl https://raw.githubusercontent.com/sheran/nixos-infect/master/nixos-infect | PROVIDER=digitalocean NIXOS_IMPORT=./host.nix NIX_CHANNEL=nixos-23.05 bash 2>&1 | tee /tmp/infect.log
From the last time, we’ve added a bit more than a runcmd command. Now, we are using write_files to first write a file (host.nix) onto the newly created Ubuntu Droplet. Then, when we convert the VM to NixOS we reference that file. You will see on Line 64, we have now added NIXOS_IMPORT=./host.nix which after conversion, will execute the contents of the host.nix file and setup our NixOS server accordingly.
To test this, do the same thing as you did in our previous post when we installed NixOS. This time, paste the code above into the Initialization Scripts area instead (Fig 1.2).
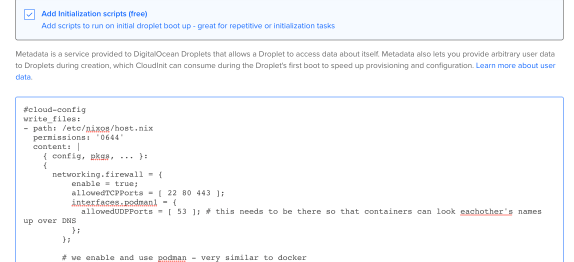
Fig 1.2 – Paste the new User Data to also configure NixOS
Then hit Create Droplet and wait until your machine gets provisioned. When it’s all done, you can paste the public IP address of the newly created Droplet into your browser and you should be greeted by the WordPress setup page as in Fig 1.3.
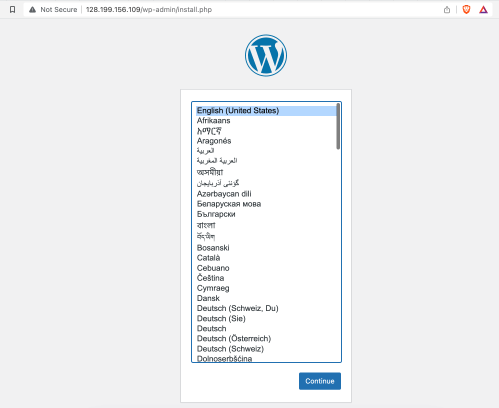
Fig 1.3 – The new WordPress setup page on my newly provisioned Droplet.
About the Author
Sheran Gunasekera is a security researcher and software developer. He is co-founder and Director of Research for Madison Technologies, a product development company in Singapore, where he advises the in-house engineering team in both personal computer and mobile device security. Sheran’s foray into mobile security began in 2009 when he started with BlackBerry security research. Since then, he has been in leadership roles in both engineering and security at several start-ups in Asia including GOJEK, the on-demand multi-service app that is now publicly listed.
9 minutes read
Like what you see? Here are more recommended articles for you:


Integrating AI into Super Apps for Better User Engagement
4 minutes read